1
/
of
1
forexeasourcecodes
EX4 EA Profit V10 Trader V3
EX4 EA Profit V10 Trader V3
Regular price
$0.00 USD
Regular price
Sale price
$0.00 USD
Quantity
Couldn't load pickup availability
Key Differences Between Code 2 and Code 3
1. Timeframe Selection
-
Code 2:
- Hardcoded to run only on the H4 (4-hour) timeframe.
- Checks Period() != PERIOD_H4 in the start() function, displaying an error if the chart is not on H4: "ERROR :: Invalid Timeframe, Please Switch to H4 !".
- Uses PERIOD_H4 for all indicator calculations (e.g., iMA(NULL, PERIOD_H4, ...) and iRSI(NULL, PERIOD_H4, ...)).
-
Code 3:
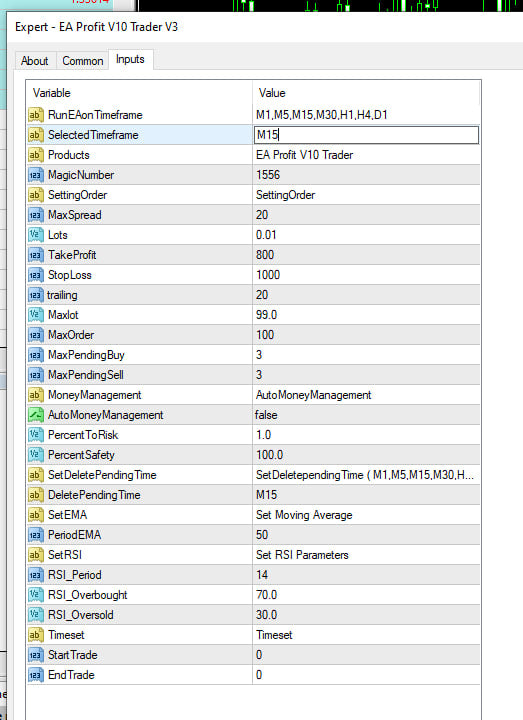
- Allows the user to select the timeframe via a new external parameter SelectedTimeframe (default: "H4") with valid options: "M1", "M5", "M15", "M30", "H1", "H4", "D1".
- Repurposes RunEAonTimeframe as a string to list valid timeframe options: "M1,M5,M15,M30,H1,H4,D1".
- Adds a new function GetTimeframePeriod() to convert the SelectedTimeframe string to the corresponding MQL4 period constant (e.g., PERIOD_M1, PERIOD_H4).
- Validates the chart timeframe with Period() != timeframe, where timeframe is obtained from GetTimeframePeriod(SelectedTimeframe), and displays a dynamic error message: "ERROR :: Invalid Timeframe, Please Switch to " + SelectedTimeframe + "!".
- Impact: Code 3 is more flexible, allowing the EA to operate on user-selected timeframes (e.g., M1, H1, D1) instead of being restricted to H4. This makes it adaptable to different trading strategies or market conditions but requires users to ensure parameters like TakeProfit, StopLoss, and MaxSpread are suitable for the chosen timeframe.
2. Indicator Calculations
-
Code 2:
- All indicator calculations (iMA for EMA and iRSI for RSI) use PERIOD_H4 explicitly in functions like CheckDrawdownAndHedge(), IsBullishTrend(), IsBearishTrend(), DeleteInvalidPendingOrders(), and start().
- For example: iMA(NULL, PERIOD_H4, PeriodEMA, 0, MODE_EMA, PRICE_CLOSE, 0) and iRSI(NULL, PERIOD_H4, RSI_Period, PRICE_CLOSE, 0).
-
Code 3:
- Replaces PERIOD_H4 with timeframe (from GetTimeframePeriod(SelectedTimeframe)) in all indicator calculations.
- For example: iMA(NULL, timeframe, PeriodEMA, 0, MODE_EMA, PRICE_CLOSE, 0) and iRSI(NULL, timeframe, RSI_Period, PRICE_CLOSE, 0).
- Updates iOpen(NULL, 0, 1) and iClose(NULL, 0, 1) in start() to use iOpen(NULL, timeframe, 1) and iClose(NULL, timeframe, 1).
- Impact: Code 3 ensures that EMA, RSI, and price data (open/close) are calculated based on the user-selected timeframe, maintaining consistency across all trading logic. This makes the EA adaptable to faster (e.g., M1) or slower (e.g., D1) timeframes, potentially affecting signal frequency and trading behavior.
3. Display Information (f0_3() Function)
-
Code 2:
- Displays EA information (e.g., balance, equity, orders) via Comment but does not show the timeframe in the output.
-
Code 3:
- Adds a line to the Comment output: "## Timeframe :: " + SelectedTimeframe + Ls_8, showing the user-selected timeframe on the chart.
- Impact: Code 3 improves user experience by explicitly displaying the selected timeframe, making it easier to confirm the EA’s configuration.
4. Error Messaging
-
Code 2:
- Shows a static error message if the chart is not on H4: "ERROR :: Invalid Timeframe, Please Switch to H4 !".
-
Code 3:
- Shows a dynamic error message based on the user’s selection: "ERROR :: Invalid Timeframe, Please Switch to " + SelectedTimeframe + "!".
- Impact: Code 3 provides clearer feedback to the user about the expected timeframe, reducing confusion when changing timeframes.
5. New Function: GetTimeframePeriod()
-
Code 2:
- No such function; relies on hardcoded PERIOD_H4.
-
Code 3:
- Adds GetTimeframePeriod(string timeframe) to map the SelectedTimeframe string to MQL4 period constants:
- "M1" → PERIOD_M1, "M5" → PERIOD_M5, ..., "D1" → PERIOD_D1.
- Defaults to PERIOD_H4 if an invalid timeframe is entered.
- Adds GetTimeframePeriod(string timeframe) to map the SelectedTimeframe string to MQL4 period constants:
- Impact: This function enables dynamic timeframe selection, centralizing the logic for converting user input to a valid timeframe period, improving code maintainability.
6. No Changes to Core Trading Logic
-
Both Codes:
- The core trading logic (e.g., OrderSend for BUYSTOP/SELLSTOP, trailing stops in f0_2(), hedging in CheckDrawdownAndHedge(), RSI-based trend checks in IsBullishTrend()/IsBearishTrend(), and pending order deletion in DeleteInvalidPendingOrders()) remains unchanged in terms of conditions and parameters.
- Parameters like MaxSpread, Lots, TakeProfit, StopLoss, MaxPendingBuy, MaxPendingSell, RSI_Period, etc., are identical.
- Functions f0_0(), f0_1(), f0_2(), f0_4(), and others are unchanged except for timeframe references.
- Impact: The trading strategy (e.g., entry/exit rules, hedging, risk management) is unaffected, but Code 3 applies it to the user-selected timeframe, potentially altering signal frequency and performance.
Summary of Functional Differences
-
Timeframe Flexibility:
- Code 2 is restricted to H4, while Code 3 allows the user to select from M1, M5, M15, M30, H1, H4, or D1 via SelectedTimeframe.
-
Indicator Consistency:
- Code 3 ensures all indicators (EMA, RSI, open/close prices) use the selected timeframe, while Code 2 uses H4 exclusively.
-
User Feedback:
- Code 3 enhances the chart display (f0_3()) and error messages to reflect the selected timeframe, improving usability.
-
Code Structure:
- Code 3 adds the GetTimeframePeriod() function for dynamic timeframe handling, making it more maintainable and adaptable.
Potential Implications
- Trading Behavior: Code 3’s flexibility allows the EA to operate on faster timeframes (e.g., M1, M5), which may increase trade frequency and risk, or slower timeframes (e.g., D1), which may reduce signals but focus on larger trends. Users must adjust parameters like TakeProfit, StopLoss, and MaxSpread to suit the chosen timeframe.
- Performance: Performance may vary significantly across timeframes. For example, M1 may generate more noise, while D1 may miss short-term opportunities. Testing on a demo account is recommended.
- Usability: Code 3 is more user-friendly due to dynamic error messages and timeframe display, but users must ensure the chart matches SelectedTimeframe.
- Risk: Lower timeframes may require tighter risk management (e.g., smaller Lots, MaxPendingBuy/MaxPendingSell) due to increased volatility.
Share